Connect via USB-C (modern Cisco gear)
Cisco's newer platforms — the 1200/3100/4200 Secure Firewalls and Catalyst 9000 switches — ship with a USB-C console port as a first-class option alongside the traditional RJ45. The USB-C path is strictly easier than RJ45 for one reason: the target device itself acts as the USB-serial converter, so you don't need an FTDI or Prolific chip in the cable.
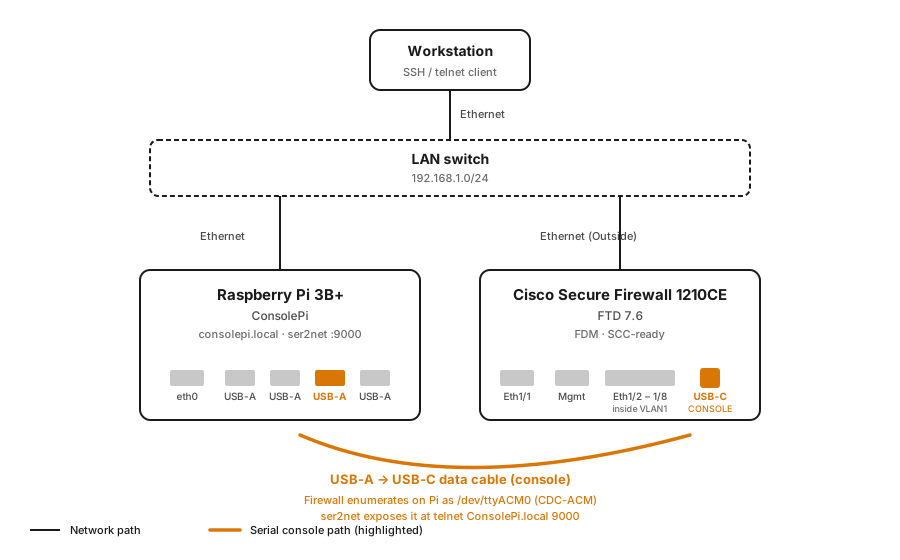
Amber path = the USB console cable. Both devices are also attached to the LAN via Ethernet, but the console data flows over the USB link, not over the network.
What you need
- Any USB-A to USB-C data cable — the kind you'd use to charge a phone with data-transfer support. Any working USB-C data cable in your drawer probably works.
- NOT a charge-only cable. Some cheap USB-A→USB-C cables only pass power. If a cable makes your phone charge but doesn't let it appear as a device to your PC, it's charge-only. Won't work here.
Physical connection
- USB-A end into any USB port on the Pi
- USB-C end into the target's USB-C console port (usually labeled with a "CONSOLE" screenprint)
What the Pi sees
The target enumerates as a USB Communications Device Class (CDC-ACM) device:
And a /dev/ttyACM* character device appears:
Udev populates useful attributes:
udevadm info -q property /dev/ttyACM0 | grep -E '^ID_'
# ID_VENDOR=Cisco
# ID_MODEL=Cisco_USB_Console
# ID_MODEL_ID=0009
# ID_SERIAL=Cisco_Cisco_USB_Console
ser2net port mapping
ConsolePi's ser2net config maps /dev/ttyACM* devices to telnet ports:
| Device | Telnet port |
|---|---|
/dev/ttyACM0 |
9000 |
/dev/ttyACM1 |
9001 |
/dev/ttyACM2 |
9002 |
/dev/ttyACM3 |
9003 |
/dev/ttyACM4 |
9004 |
/dev/ttyACM5 |
9005 |
/dev/ttyACM6 |
9006 |
/dev/ttyACM7 |
9007 |
(Traditional USB-serial adapters at /dev/ttyUSB* map to 8001-8008;
covered in Connect via RJ45.)
Talk to the device
From any host on your LAN:
Hit Enter to elicit a prompt from the target device.
Exit telnet: Ctrl-] then quit.
Alternate: SSH + screen (direct)
If you'd rather bypass ser2net entirely (fewer moving parts, no telnet required):
Exit screen: Ctrl-A then k to kill, or Ctrl-A then d to detach.
Baud rate on a USB-CDC device is largely nominal — the USB protocol carries the data at native USB speeds — but conventionally we set it to 9600 to match legacy expectations.
Watch out for
- RJ45 console and USB-C console can be plugged in simultaneously. On Cisco boxes, USB-C wins when both are connected. If you plug in the USB-C cable and get no output, check whether the RJ45 side is actively holding the console; unplug it if so.
- The
/dev/ttyACM0number can change if you plug and unplug multiple devices. If you're building persistent aliases, use theby-idpath (/dev/serial/by-id/usb-Cisco_Cisco_USB_Console-*) instead of/dev/ttyACM0.consolepi-addconsolehandles this for you. - The USB-C port doesn't deliver power to the cable. The Pi's USB-A is the power source for the link.
Multiple devices
The Pi 3B+ has 4 USB ports, so you can console 4 devices simultaneously
without a hub. /dev/ttyACM0 through /dev/ttyACM3 are usable at once,
each on its own telnet port (9000-9003).
If you need more, add a powered USB hub — but each additional device adds a failure mode. Consider a second ConsolePi for a large fleet (they auto-discover each other via mDNS).
Next
- Access Methods — telnet, SSH,
consolepi-menu - Troubleshooting — if something isn't working